How to Manage Your DNS Zone Records via the cPanel Zone Editor
Managing DNS records is an important part of controlling how your domain behaves on the internet. Whether you're pointing your domain to a web server, connecting third-party services, or verifying domain ownership, the Zone Editor tool in cPanel allows you to add, update, and remove DNS records quickly and easily.
This guide walks you through accessing the Zone Editor, understanding the most common types of DNS records, and performing essential tasks such as adding, modifying, and deleting records.
An Important Reminder Regarding DNS Record Propagation...
After updating DNS records, changes usually take effect within minutes, but full global propagation can take up to 24 hours. This delay is normal and depends on DNS caching by various networks.
Tips for Managing DNS Records Safely
- Always keep a copy of existing DNS settings before making changes.
- If a provider gives you DNS instructions, input them exactly as written.
- Avoid editing or deleting system-generated zone records unless instructed.
- Use the search bar in the Zone Editor to quickly find specific entries.
Lets continue to the guide...
Accessing the DNS Zone Editor in cPanel
To access your DNS zone records, start from your client portal dashboard:
- Click on the “Services” box.
- Select the Elastic Hosting package associated with the domain you want to manage.
- On the left-hand side under the Actions list, click “Log in to cPanel.”
- In the cPanel search bar (top right), type “Zone Editor”, then click the first result. See below for an example of what you should be looking at.
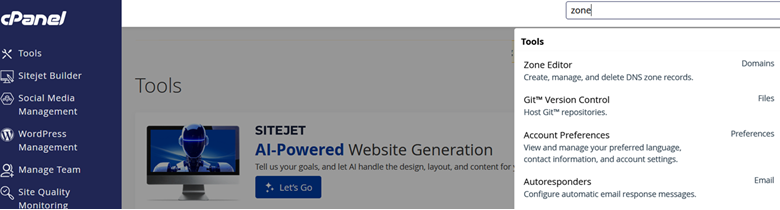
Once inside the Zone Editor, you will see a list of domains associated with your account. Each domain will have options to Add (A, CNAME, MX) or Manage records.
Common DNS Record Types
Before making changes, it's helpful to know what each record does:
- A Record – Points a domain or subdomain to an IPv4 address.
- CNAME Record – Points one domain name to another "canonical" name-based destination..
- MX Record – Directs email to a mail server.
- TXT Record – Often used for verification or SPF/DKIM/DMARC settings for email.
- SRV Record – Defines service-specific information
Adding a New DNS Record
To add a DNS record:
- From the Zone Editor, click Manage next to the domain.
- Click the Add Record button (or choose a specific record type such as Add A Record, Add CNAME Record, etc.).
- Fill in the required fields:
- Name – The hostname or subdomain (e.g., www, blog.example.com, or leave blank for the root domain).
- TTL – Time To Live (default is usually fine).
- Record Value – IP address, hostname, or other data depending on the record type.
- Click Save Record to save your changes.
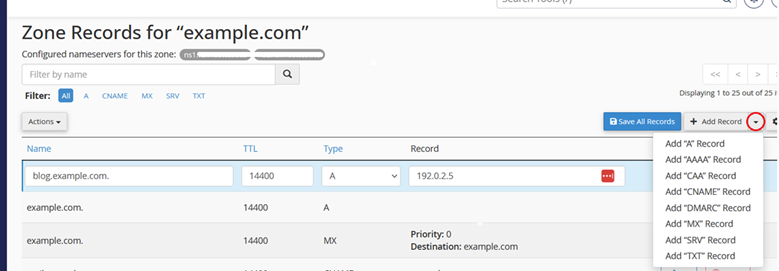
Example: Adding an A Record
- Name: blog
- Type: A
- Record: 192.0.2.5
Below: sample screenshot showing a filled out A record form. The drop down menu highlighted in red the drop down menu used to select a record type to add.
Example: Adding a CNAME Record
- Name: www
- Type: CNAME
- Record: 192.0.2.5
Below: sample filled out cname form will cause www.example.com to be redirected to example.com when saved.

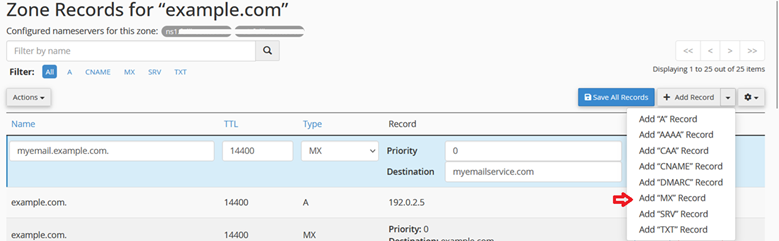
Example: Adding an MX Record
- Name: myemail
- Type: MX
- Priority: 0
- Destination: myemailservice.com
Below: filled out form for an mx record that will route mail from myemail.example.com to myemailservice.com. A DNS search would have to continue to myemailservice.com's records in search of the correct destination IP address.
Modifying an Existing DNS Record
Sometimes you need to update an existing zone record;
- In the Zone Editor, scroll through the list (or use the search bar).
- Locate the record you want to change.
- Click Edit next to the record.
- Adjust the necessary fields (e.g., IP address, hostname, TXT content).
- Click Save Record.
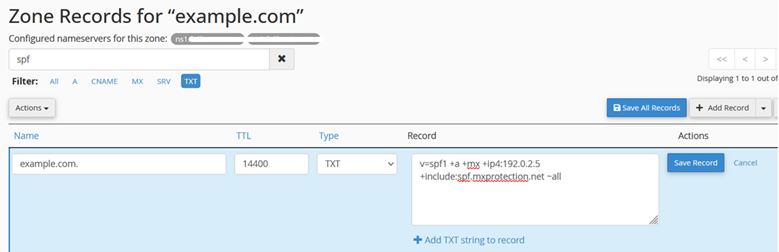
Example: Updating a TXT SPF Record
Old value: v=spf1 +a +mx +ip4:192.0.2.5 ~all
New value: v=spf1 +a +mx +ip4:192.0.2.5 +include:spf.mxprotection.net ~all
Below: a TXT record for example.com is being changed to the new value listed above.
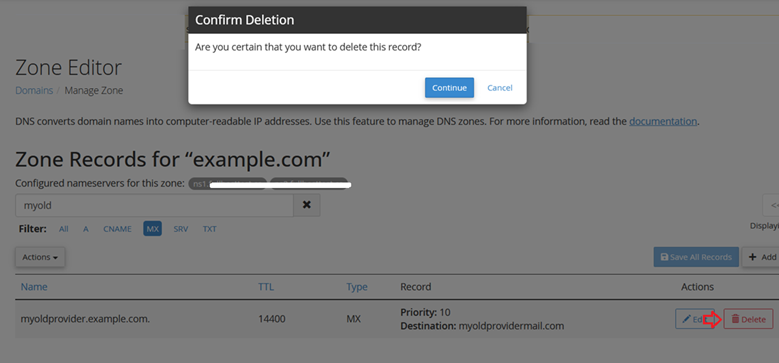
Deleting a DNS Record
⚠️ Important: Deleting the wrong record can break your website or email. This can grind your business to a halt. When in doubt, double-check before removing anything. Record your original DNS records before modifying in case something goes wrong.
If you no longer need a DNS entry—such as an old mail provider or a deprecated subdomain—you can safely remove it.
- In the Zone Editor list, find the record you want to delete.
- Click the Delete button (trash icon) next to the record.
- Confirm deletion when prompted.
Below: example screen including the confirmation modal.
Conclusion
Managing DNS records through cPanel’s Zone Editor is straightforward once you understand the basics. Whether you're adding new services, pointing your domain to a new host, or cleaning up old entries, the Zone Editor gives you complete control over your domain's behaviour.
